Showing posts with label Accessories. Show all posts

Sunday, March 4, 2018

Bishop Atlanta Miniature Show ~ March 3, 2018


This has been a delightful weekend! On Saturday I met up with two members of the Greenleaf Dollhouse forum at the Atlanta Miniature Show in Tucker, Georgia. After we were shopped out, we had a Show and Tell and talked and talked. My sister Helen, who is a quilter, not a miniaturist, came with me. She later said that she couldn't keep up with the conversation as it was peppered with house names unfamiliar to her, but she did get caught up in our enthusiasm and was a great second pair of eyes for spotting gems among all of the wonderful items displayed by 40-some talented vendors.

Click on a picture to see a larger version.

I promised myself to use some restraint, and, in fact, saw some great items on the very first table in the entry hallway but kept on walking. Once inside the exhibit hall, however, my wallet broke open. An unidentified lady was selling rolls of wallpaper, all you wanted for $1. Really! Some of them were really quite lovely. I ended up with these four, all for $1. 😊 I think they are destined for the Beacon Hill. The bottom one, with the scallop design, may go into the entry hall. The plain and flowed blue rolls may go into the master bedroom, and the lovely ivory with a subtle stripe and sheen may go into the bathroom. [During the show and tell, we discovered that all three of us bought paper from her, and two of us bought the same two blue sheets. Great minds, eh?]

The next stop was at Marie's Mini Shoppe (Lake Worth, FL) for two pieces of lace, one white, one ecru. They are a very nice scale for curtains and may end up in the Beacon Hill and/or Miss Marple's Cottage (the Glencroft). They also had a very nice basket of bell peppers, which are destined for the kitchen of the 1890s Pierce/Bohemian Inn,

The next stop was at Magic-N-Miniature (Dayton, OH). I found some nice things for the Bohemian Inn -- a liquor barrel on a stand for the bar and a large wooden bowl, meat cleaver and large knife for the kitchen. 

While I was waiting to pay, I spotted a stove that looks as if it belongs in the Bohemian Inn kitchen. It turned out to be a lot less expensive than I anticipated, so that went into the bag as well. From even a short distance, it looks like it is made of metal, yet it is wooden, beautifully aged.

 Iklectic Kollectibles (Haupauge, NY) had a cabinet the will go into the Bohemian Inn kitchen and a faux pressed tin ceiling, also for the kitchen.

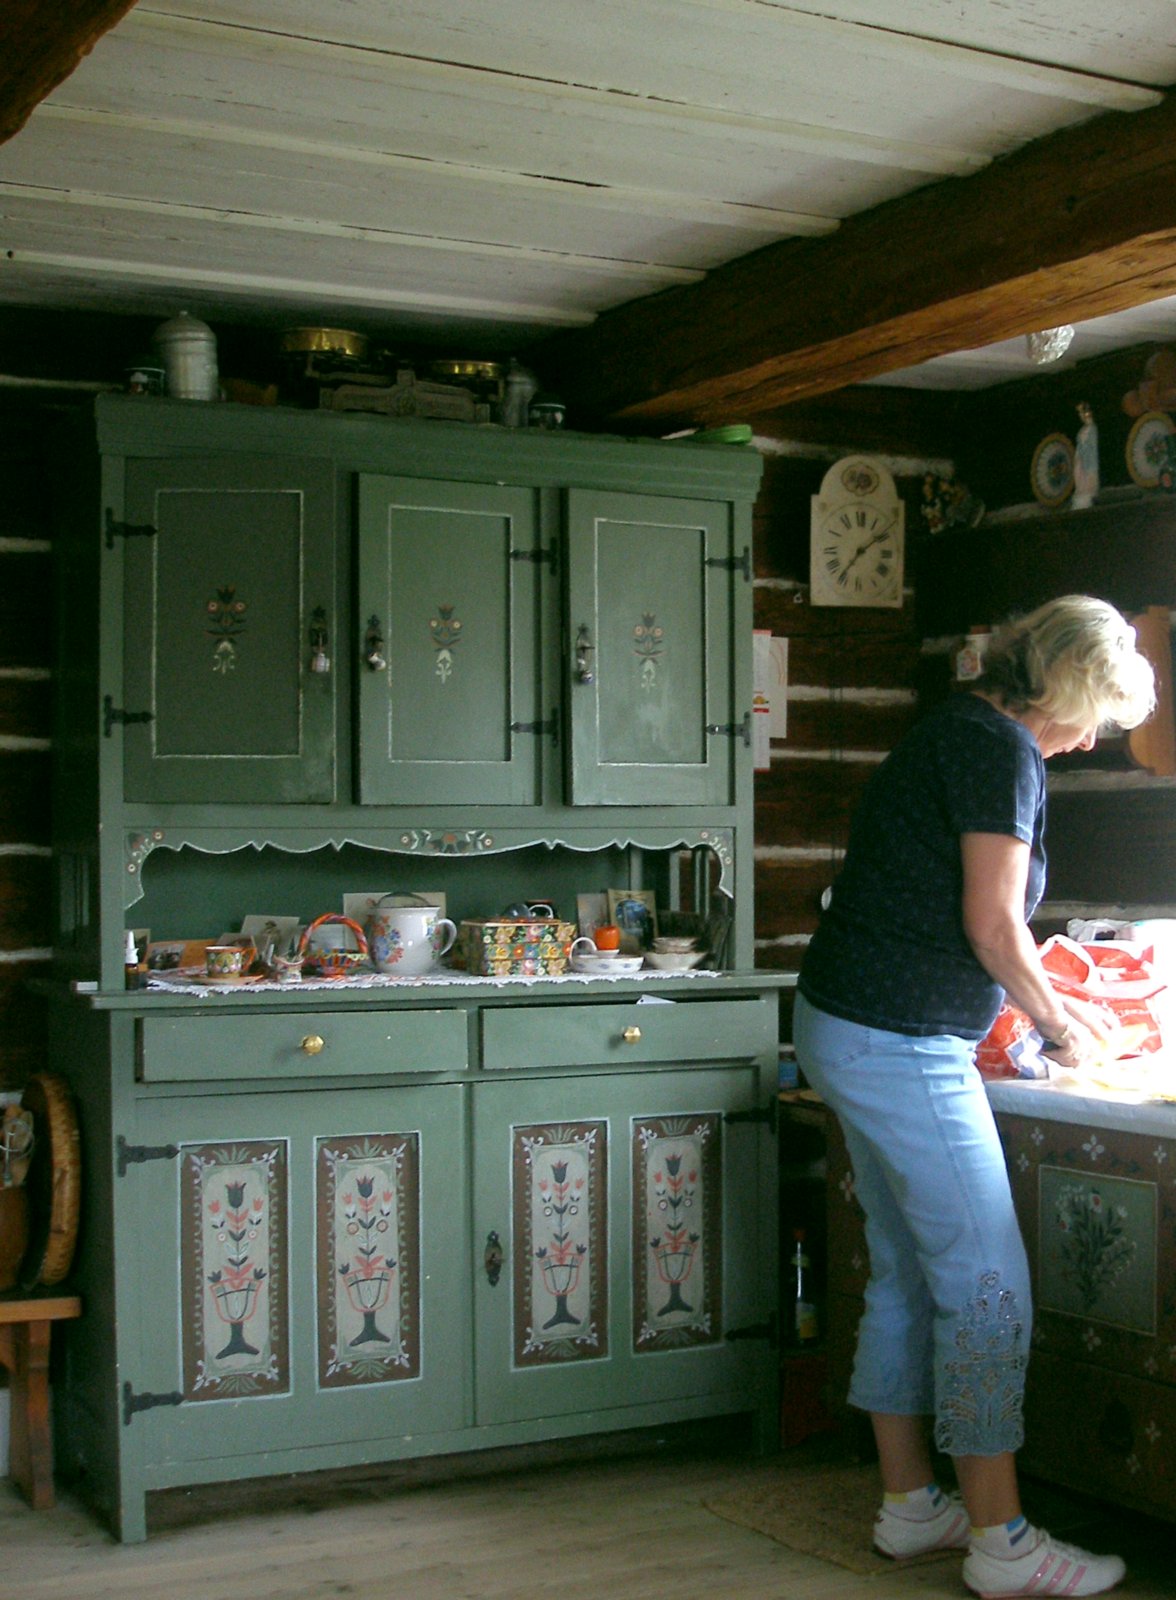
The cabinet will not remain this color. It will be painted to resemble this cupboard, which is in a summer cottage owned by my cousins in the Czech Republic. One of them refinished the cabinet and hand painted the designs.

Jane Graber (Frankfort, MI) had a wonderful selection of her hand thrown pottery. I limited myself to one plate, which will go into Miss Marple's house.

I've got a pretty wide selection of beer and liquor bottles for the Bohemian Inn's bar, but at Wilson Santiago's Dollhouse Linens and More (Winder, GA), I spotted two Reutter Porzellan Blue Onion design beer steins for a very good price. I'm not sure if they will sit on the bar or hang above it, but that is definitely their destination.

That ended the sweep of the exhibit hall, so we headed back out to the tables in the entrance, the ones I'd passed up on the way in but kept in mind. At Rosamonde's Cottage (Lansing, IL), is scooped up the wonderful garden shelf and a tea tray for Miss Marple's cottage . The sack of flour with a scoop and the prep tray with a pot of potatoes will go into the Bohemian Inn's kitchen. The brass spittoon will likely go into the inn's bar area.

Another table I'd passed up was Karen Aird's Dollhouse Shop (Basking Ridge, NJ). There I found some beautiful flower planters that will probably end up at Miss Marple's Cottage. The copper sauce pans and bowl of eggs will go in to the Inn's kitchen, and the poppy dish will go into the Inn as well. Poppies are very Czech.

By this time, Helen and I were ready for a sit-down. Sparklepuppies joined us, and I went back into the exhibit hall to find WestPaces. We stopped at Miniature Designs (Lawrenceville, GA) so she could make a purchase. While I was waiting for her, I of course perused the table, where I spotted a fantastic little weight-driven cuckoo clock, perfect for the Bohemian Inn! It is hand carved by Fred Cobb, a well-known local artisan, and reminds me of a real life cuckoo clock that our grandfather brought over from the old country in the late 1890s. I apologize for the quality of the photo, but if you click to enlarge, I think you can see the cuckoo poking his head out.

Finally finished with shopping, we found a quiet table and held our Show and Tell. What a grand day! From the left, WestPaces, sparklepuppies, and KathieB -- our forum nicknames.

It is such a treat to be able to enjoy the artistry and craftsmanship of the dedicated artists from around the country, and pure delight to be able to share the experience.

Tuesday, January 23, 2018

A Little Shopping Spree


A miniature buddy came to visit last week, so a trip to Miniature Designs in Lawrenceville, Georgia, was high on the places-to-go list. Even better, a friend from the Greenleaf Dollhouse Forum was able to meet us there. I found goodies for the Beacon Hill and the Pierce, and even something for the White Orchid Christmas House.

The shrubbery in this photo will be used for a different project. I've moved into a new house, and the backyard needs to be redone from its current state. I'm going to make a model so the landscaper knows exactly what I have in mind. I have some other bits and pieces on hand. Will snip apart the forsythia to make some smaller bushes.

The following items are for the Beacon Hill. The lyre table was on sale. So was the lamp. It lights up beautifully. The cranberry glass charger on the table reminds me of fine Bohemian glass. The brush and comb are from an estate sale. The brush has real bristles. I was told they are horsehair, but I think they are fare too fine for anything found on a horse. The mirror has real glass, not just painted silver. The little jewelry box opens.


This little tin is about the size of a dime. It's going into the Christmas house, naturally.

The eyebrow windows and the pheasant are destined for the Pierce/Bohemian Inn. While growing up, we had a stuffed pheasant that my father had shot back in the day. While in the Czech Republic (now Czechia) a few years ago, I saw a pair of pheasants meander their way across the hillside behind our hotel. I'm not sure if the pheasant will be inside the building (presumably stuffed) or outside in the garden.

I've not worked on minis for a while. This trip has prompted me to get back at it! Heading in to the craft room in a few minutes to get organized! Miniature Designs keeps a wide variety of wallpapers. If I could remember what furnishings I have for the Beacon Hill, I could have bought wallpaper and ceiling paper and maybe some plaster ceiling rosettes. Will have to plan another trip soon!

The drive to Lawrenceville on three sections of interstate prompted me to find our way home on surface roads; it was a half hour longer but far less stressful. Later in the day I signed up for an Uber account!

Wednesday, August 14, 2013

Don't Rat Me Out!


This morning on the Greenleaf Dollhouses Forum, a member remarked that I seem to be having more fun than the law allows with the Haunted Hangout. (True!) I responded with "Don't rat me out!" ... and thus was set off a chain of events that kept me in the basement for most of today and resulted in just what was needed in the room with the stove -- a rat cage!

I had auditioned some Lemax rats earlier but they didn't make the cut because they come with bulky (for their size) gray bases. They didn't look right standing on the floor. But, I thought, if I could hide the bases ... like in bedding material. Well, you can see where this took me. I Googled "mouse cages" for inspiration. Lots of toys and tunnels seemed to be the order of the day.

I came across a box from a piece of Reutter Porzellan while digging through the stash yesterday. It was just the right size for the cage. I painted some mesh black and glued it to the top to give the appearance of an air source for the li'l devils.


  • An upturned flower pot became a house. 
  • A glass medicine ampule plus a bead and a bit of wire painted silver became a water bottle. (The blue lines were on the ampule.)
  • Five pony beads glued onto a pipe cleaner became a tunnel. 
  • A leftover piece of opaque plastic from a tea light cover became a smaller tunnel. 
  • A piece of fancy trim became a climbing rope/swing. 
  • And some wood chips I found in the "kitchen stuff" box became bedding. I think they were meant to be nacho chips. They were a bit big. I don't want to tell you how long it took me to chop them down to a useable size with a sharp craft knife. 


The exercise wheel is a combination of cloth-covered florist wire and paper mesh painted silver. The cage was getting crowded, so I skipped a wire base and glued it to the back wall. It's not functional, but I don't think the rats have noticed. The base is a block of wood glued to a piece of flat wood. It needed a bit of height.
 

I really thought this would bring the Haunted Hangout to a close, but as luck would have it, I found a maple leaf paper punch as I was hunting for the plastic box. Now I'm thinking a scattering of leaves and some moss on the roof is in order. At the rate I'm going, it will be Hallowe'en before this is finished!

Tuesday, August 13, 2013

Getting in the Spirit


The Haunted Hangout got a lot of decorative touches today. There is still more to be done, but I can see the light at the end of the tunnel ... or is that the light on the other side?  Ooooooooh.

Here are updated pictures of the four rooms. You'll notice I've decided not to hang curtains. There's enough going on in each room to intrigue the viewer, and I don't want to block light from the outside. Almost everything in each room  is glued down with the exception of the skeletons. I want to get some good individual photos of each one before they get glued in place. (Yes, I'm gluing everything down. I don't want anything flying around when the house gets turned or jostled.)

The game room now has a light made from a flickering tea light with a shade made from part of one of those tiny bottles of shampoo one gets in motels and hotels. It doesn't add much to the illumination, but it does add to the ambience. The awkward table has been replaced with a rectangular one that works much better.  The bench under the window now has playing cards and a book of card game rules. The wooden chair at the left has a cloth seat. One of the pets has crawled out from under the table to see what's going on. He's keeping his favorite bone close.

One of the skeletons is holding the box of game pieces, ready to set up the board.

The wall hanging is made of punch out pieces from one of the Orchids embellished with puff paint and feathers.

I'm pleased with the pose on the skeleton moving the table. He may appear a bit stiff in the photos, but he looks very real in real life. If you look very carefully at the tea light, you can see a translucent bat glued near the top. It's more easily seen in real life.

The two skeletons visiting in the parlor have updated their costumes. The table of potion bottles is new. I build it with more scrap wood and added some bead bottles I had in my stash. The light is another tea light with a bottle shade. They add a nice bit of flickering light to the scene on the ground floor, which is somewhat shaded by the porch roof. The upstairs rooms are brighter and don't seem to need extra light. The rug has been changed out. The paper rug is gone and a piece of fabric from a designer's sample book has replaced it.

The next photo is blurry and I apologize. I want you to see the relaxed pose of the skeleton on the sofa. The pot of flowers that you can barely see in the back corner is also new. A pot from the stash plus some snippets of real life plastic flowerlets.

The reading room also has a new rug from the same source. The furniture has been moved around a bit.

It's easier to see (and appreciate) the corner cabinet in this corner.

If I'd realized this was going to turn into a reading room/library, I would have filled this with books instead of dishes and foodstuffs. Oh, well, it makes the room look cozy. I added some flowerlet snippets to the vase of peacock feathers to give it a little more of a presence.

In the room with the stove, I added two floral pieces, the ghost on the wall, and a cushion to the bench. This fellow looks rather pensive. I wonder what he's thinking about.

The little ghost on the back wall is from the scrapbooking packet. The table with potion bottles that is in the parlor was made for this room, but I like it better in the parlor. This room needs something. Not sure what.

The stove wall needs some decorations and a touch of "rust" on the stove and coal scuttle. I did a wash of raw umber on parts of them, but it doesn't show up.

Wednesday, July 3, 2013

A Cottage Bed

Goodness! Almost five months since the last post. Real life ... well, you know that story. *sigh* I'm glad to be back in the land of the minis!

A few days ago I built a little rustic chaise longue for a friend who has recreated his grandfather's brick cabin in Australia. Grandfather was a ship's carpenter, and although the chaise is rustic, it has the nice lines of Victorian style. This is the inspiration -- a photo of Grandpa's bed.

I did a rough sketch but didn't make a detailed blueprint. I had the approximate measurements in my head and winged it. I used scrap wood with wood glue, white craft acrylic paint and a final coat of clear satin finish polyacrylic. I was so busy building that I forgot to snap any other construction photos.

Here are the three components: the frame, the bit that keeps the mattress from sagging between the slats (Is there a name for that? Somebody help me out here, please!), and the mattress. The mattress is thin and lightly padded. It consists of two halves glued together. Each half has a piece of paper, a piece of heavy flannel, and the cover, which is light cotton. By having the paper as a core, the mattress can be bent to the angle of the backrest and will hold its shape.

The photo was unclear as to whether this part was wood or cloth, but since Grandpa was a ship's carpenter, I opted for aged canvas. It is glued in place.

When it was finished, I invited the old farmer over to check it out. He found it quite comfortable. The mattress ties were added to give the mattress a more realistic appearance. I trimmed them a bit after this photo was taken.


I hate to tell you how long it has been since I made the commitment to make the bed. Once I got started, it took just over a day to complete, even allowing time for glue and paint to dry. Anyway, it's on its way to Australia. (Wish I were delivering it in person!)

Now I'm looking forward to getting back to the Pierce/Bohemian Inn. The innkeeper is getting testy over the construction delays!

Sunday, October 7, 2012

Working Ceiling Fan Tutorial


In an earlier post I shared the ceiling fan I made for the Quilt Shop Room Box and told you I wanted to make a working version. Later I posted a short (poor) video of the working fan. Here is a much better video of the fan in motion. I think the black bars in the earlier one were from the LED lights in the box. This time I didn't turn them on.


In response to several requests for a tutorial, here goes:

Here are the basic components of the fan itself. For a photo of the origins of the fan blade hardware, look at the earlier post. The clear plastic star is a mirror fastener that was replaced by a plain disc as the build evolved. The fan blades are cut from a sheet of frosted Mylar. I chose the Mylar because it was thinner than a credit card (so more to scale), wouldn't warp like paper/card stock might, and has a "tooth" surface that takes paint well. Note the tiny hole in the end of the eighth-inch wooden dowel that became the shaft. The translucent red bead serves as the motor. Because of the variety of materials that had to be glued together, I went straight for the E-6000.

You may have noticed the gloss black paint in the previous photo. I didn't use it. The matte finish looked more like "old fan" to me, so I used it exclusively. I gave the small end of the hardware bits a slight twist before gluing them to the center flat bead, so the blades are canted slightly, as in a real fan.

My apologies for the out-of-focus picture of the loop at the end of the shaft. I have a new camera and haven't yet figured out the close-up settings. I stripped the paper from a twist-tie to get a pliable wire to make the hook. I ran the two ends through the hole in the shaft from opposite sides and then did some simple twisting to get the loop you see. That slight bulge at the top of the shaft is a narrow strip of tape covering the hole. I'm not sure it was necessary, but the wire was a bit rough in that area and I didn't want it to get hung up while threading it through the base cap and ceiling.

This is a view of the ceiling cap. The clear star that you saw above was replaced by a plastic pull-seal from a carton of half-and-half. I cut off the ring part and cut a hole in the center. That is a wooden bead glued in place to form a bit of a sleeve for the shaft to keep it from wobbling. If you look carefully, you can see that the hole in the bead and the hole in the ceiling don't quite match up. I had problems with the shaft sticking when I tried to thread it through. As luck would have it, I had some plastic drinking straws that just fit into the space. A snip from the end of a straw became a smooth lining for the sleeve. Wobble cured.

There's no magic formula for the length of shaft or ceiling base. I eye-balled it and made several small trims to get it to the point where it all worked together.

This is the twirler that I ended up using. It is battery operated and came with an extra battery from Christmas in Prescott.  It is sitting over the hole that I drilled in the room box roof. The scrap bits of angle molding are glued in place to keep the spinner from moving from the vibrations. (You're right -- I don't throw anything away!)

Here's how it goes together. The fan shaft is passed up through the ceiling cap and the spinner hooks onto the loop. I wanted the fan to be removable to spar it from jarring in the event the box needs to be moved an appreciable distance.

When the shaft is hooked, the fan looks like this.

What would I do differently next time? I'd be sure I have hardware for both sides of the blades. It's not noticeable to the casual viewer, but I know it's missing.

Tuesday, August 10, 2010

Details, details, details!

Here's an overview of the quilt shop. The shop (lower left) is coming along nicely. The workroom (above the shop) is also coming along. The bathroom needs wall hangings. My friend NJ says she has just the thing for in there. :) The apartment (upper right) is still in chaos. The furniture is there just to see what it looks like with furniture. The Murphy bed will stay. Not sure about anything else. Below the apartment is the large room where the quilts will be displayed, and behind it the kitchen/workroom. Poke the picture to see the details.

I'm debating whether to have the Murphy bed open or closed. NJ says it should be open or people won't know what it is. But I wonder about it being open during the day. Makes the owner seem a bit lax with her housekeeping!
Remember the empty spot on the counter? It has been filled with spools of thread in a basket.
.
Here is the finished shelf unit. The little wall hangings across the top were cut from fabric. I really like the detail in this. Too bad most of it won't be seen because the unit is toward the back of the room on a side wall. I hope folks peek in the window to see it.

I started hanging quilts to add color to the walls. The big quilts, back and at right, are glued to a bamboo skewer, which runs through screw eyes. If this reverts to a residence one day, the tiny holes can be filled or papered over. The smaller quilt also has a skewer glued to it. The skewer holds it just far enough from the wall to look more "real". I think the smaller quilts are light enough to be held up with miniwax. Note the quilt in progress on the far worktable. The nearest chair holds sewn strips for another quilt. More about that later.
Here's a better shot of the apartment. The resin lady appeared in a box of minis given to me by a friend last May. She's knitting. The furniture, except for the Murphy bed, is in there to be auditioned. Still not sure what this room will look like, but it's beginning to feel like a personal hideaway in a commercial establishment.
This is how the quilt on the worktable (above) got to have such realistic folds and draping. This is the quilt for the near table. The quilter is sewing a strip in place. The pink contractor's foam is standing in for the table and the bit of foamcore board is standing in for the sewing machine. I didn't want to get them gunked up with hair spray.
Here is a strip of wall hangings that will go over the doorway between the show room and the kitchen. They have also received a dose of hairspray to give them some life. I want them to appear to be fluttering. The two bundles in clamps are quilts. It's nearly impossible to fold a quilt this small and keep it from popping open. A few drops of fabric glue help considerably. I hesitated to fold these up, but what would a quilt shop be without some folded quilts on a shelf?
I talked to my friend at the local hardware store today about plexiglass for the back. I think some U-channels ought to do the trick. I want to have it enclosed for the show.