Wednesday, June 27, 2018

Head Over Heels ~ the Beacon Hill Gets Its Ceilings Painted


When the build was started, I gave most of the main house pieces a thin coat of gesso to seal the wood. Now that it is time to begin electrifying, the ceilings need to be painted properly. Today I flipped the house on its head to make it easier to do the job.

The upper bits of the tower and the chimney without its cap are nearly level. Together they make a fairly steady base. I am patting myself on the back for not permanently attaching the tower roof section. :)  Over the course of the day, I managed to get three coats of satin finish white latex paint on the ceilings, including the ceilings of the front and left bays, which are part of the middle floor/ceiling piece.

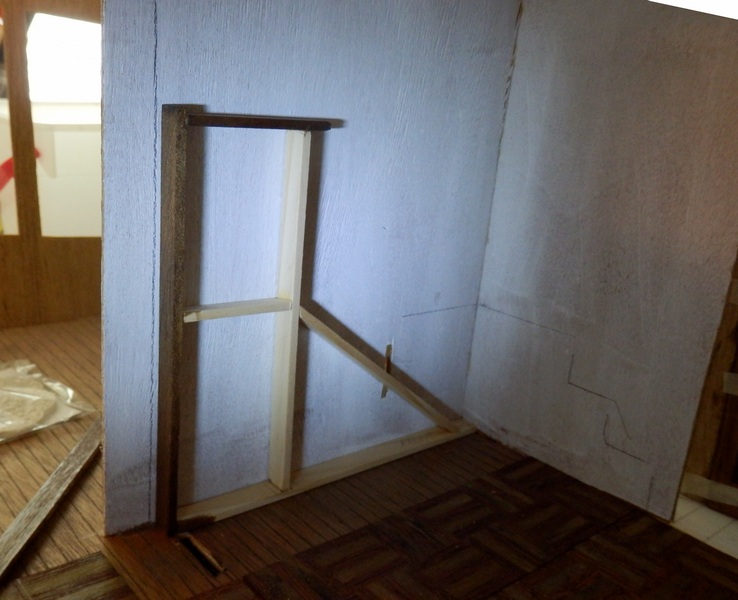
This is an overview of the room. The house has been tipped on its head, so easy to do because of the light wood construction. At this point, even without the bays in place, it is quite sturdy. I had no qualms about manhandling it. It is sitting on a piece of cardboard, which makes it easy to slide around on the plastic surface of the table.

It was very easy to paint the ceilings with the house upside down. This photo shows the one wall of the house that didn't get a coat of gesso; easy enough to do it, now that I have the gesso. 
I stopped at Michael's yesterday on my way home from getting the paint at Home Depot. Was surprised at how much the gesso cost -- $36+tax for 32 oz.  (946 ml) With a gift card and the 40% discount earned by signing up for their rewards program, it was manageable. I have $1.90 left on the gift card. :) Since gesso can be thinned with water, those 32 oz. will go a long way.

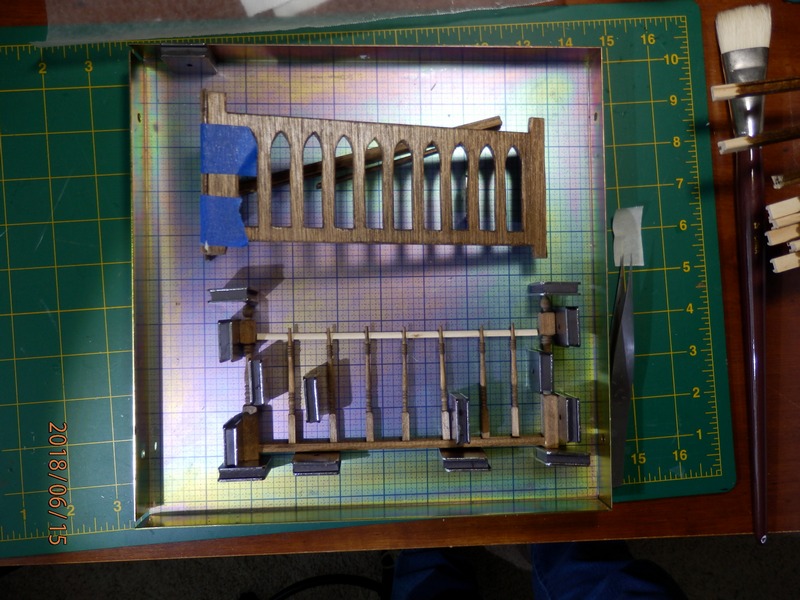
You may have noticed the chaos on the desk in the first photo. Actually, it is pretty well organized. I've been sanding the various parts of the three bays -- kitchen, front, and left. Each bay has its own clear plastic bag. (Click for photo to enlarge.) The kitchen bay, on the right is finished and ready for paint or stain. The front bay is in the box. I sand above the box to collect the sawdust. Unfortunately this room is carpeted, so controlling where the dust falls is important.

The bag on the left, with the window frames sitting on top, is the left bay. I thought it was finished, then found the frames mixed in with those from the front bay. After they are sanded, they will go into the bag with their buddies.
There is a drawer in the closet with room for the bags of bay bits where they can await installation; they need to get out of the way. My thought is that it will be easier to do the electricity (and maybe some of the wallpapering, if I can ever decide on which patterns to use) if the bays and the shingled roof sections are not installed. I know what I want to use on the dining room walls; that may be the first room finished.

The next test will be to find the box of electrical stuff with the tape wire. I know I have at least one large roll. Somewhere. Maybe in the garage. I can't recall when I saw it last. *sigh*

Sunday, June 17, 2018

Beacon Hill Staircase Makeover [Step 7 ~ Ground Floor Adjustments]


Brace yourself! I figured out how to slide the ground floor staircase past the dining room door trim. A few more tweaks needed -- when are they not? -- but the concept works.
See the filler strip to the left of the unit. It  is wide enough to permit the unit to slide past the trim on the doorway at left. The newel post on the landing needs to be reset. Somehow it got out of square, but even more important is that it needs to move closer to the wall. Not sure yet if it will dangle off the edge of the original landing or better yet, be glued to the wall. In the latter case, the baluster (or two) and handrail will be attached to the unit, and the handrail will butt up against the glued post.

The right side, up near the ceiling, was trimmed a corresponding amount. The upper corner was cut to accommodate the crown moulding. The frame of the front door will have to be adjusted to accommodate the first step, which has moved forward, but that is so far back that when everything is in place, it won't be noticeable.
But what about the floor of the landing, you ask. Won't there be a gap?
The gap is filled with the top board on this wall bracket. The bracket will be glued against the wall. The board at the base acts as a guide, so the stair unit will slide straight in. No wobble.
One thing became apparent in this fitting frenzy: there will not be room for a chandelier at the front of the foyer. One will fit in the back, by the front door. but if there is a ceiling light in front, it will have to be shallow enough to clear the stairs.
If the balusters and railing are glued to the base unit, there won't be room for any kind of ceiling light. If the balusters and railing are part of a separate unit that drops in from the middle floor, a ceiling light would be possible. My keep-it-simple solution would be one or two wall sconces along the right/living room wall. Between the two doors would light the under-stairs area. If I can find or make a sconce that sticks out less than 3/8" deep, it could go on the left wall, between the dining room doorway and the front edge. Even a small lamp or candle could be glued to the wall while a table beneath it remains removable. 
Speaking of electricity, it is time to dig out the lights and start the tape runs. For this house, I am following the Dollhouses, Trains, and More video, which suggests using the Creative Reproductions Power Connector rather than a transformer. I have the requisite supplies. Now it's a matter of before I can do this, I have to do that.

I need to get some satin white paint and paint all of the ceilings before I can think about installing any tape wire, but I think it would be useful to stage the lighting and mark the tape routes with a pencil or marker, as with wall, table and ceiling lights, the electrical schematic can will get complicated. I'm impatient to see the foyer finished, but even the flooring can't be laid until the tape wire is in place.

Lagniappe: while waiting for glue to dry, the pile of strip wood and mouldings began to annoy me. It was all heaped on a table and difficult to pull out the pieces I needed. I went out into the garage to look for a suitable container and found the milk crates.
This works well for the moment. I've marked the contents on the ends of the boxes. The loose pieces are easily identifiable. Short pieces can be rubber-banded with their full size brethren for the loose items.
Somehow I've strayed from my original intention to do up the outside before starting the inside, but this poor house has been neglected for so long that I'm happy to see any progress at all!

Friday, June 15, 2018

Tower Roof Tweaked


I think I mentioned a few blogs ago that I did not like the way the aging on the copper roof of the tower ended up. Here is what it looked like:
If you click the photo for a larger version, it is easy to see how the salt caked and built up on the surface. It just didn't look right.
I used a plastic scrubber sponge and rubbed off the salt crystals on the left side. I liked the difference. It looks more like a copper roof that is aging naturally.


When it was all dry scrubbed, I used a damp paper towel to remove most of the remaining salt dust. This photo is a bit on the blue side. It is more coppery looking in person. I may give it a coat of clear satin polyacrylic to give it a hint of metallic sheen. It's back on top of the house. I'll live with it a while before doing anything else to it.
The tower roof got attention while I was waiting for the glue to dry on the upper floor stair railing. I'm using wood glue. I like that after a few minutes the glue holds the piece together but is supple enough to make micro adjustments. It eventually sets hard. Good glue. :)
This looks as if it is somewhat cattywampus, but the jig and the old railing are keeping it square. When it is time to put it into the house, a glue dot under each newel post should keep it in place. Another glue dot will adhere the middle floor stairway handrail to one of the newel posts and yet the whole unit will remain removable.
Somebody asked me why I am making the stairs removable. Good question. For one thing, the walls that the stairs are against will be impossible to decorate if the stairs are installed permanently. If I knew what is to go on those walls it wouldn't be a problem, but I'm still undecided. For another thing, it's the challenge. I'm stretching my bashing muscles on this one, for sure!

Edit: Adding photos of finished top floor railing.

The top floor railing is out of the jig and in place. (Ignore the dust on the floor. It's going to be covered with hardwood eventually.) 

The middle stairs and top floors railing are finished. Next up is the railing for the middle floor. Can't have little people falling through!


Beacon Hill Staircase Makeover [Step 6 ~ Bottom Stairs & Upper Railing]


Two orders arrived from miniatures.com (HBS), so work on the staircase is progressing. I very cleverly sliced a wee bit from the top of the staircase to allow for parquet flooring. The good doctor is pleased to see progress. He likes the sample of stained parquet. The foyer will be elegant when finished. I don't think he has noticed a couple of engineering issues that need to be resolved.

The staircase slides in and out rather nicely now, and the plan to handle the baluster issue is pretty much resolved. BUT ... in looking at the photo, another issue appears: how to slide it past the trim that will be on the doorway to the left. It will be impossible to twist it enough to clear the trim.

Removal of a slice from the section at upper right would move it far enough to the right to slide past the doorway, but when it is in place there would be a gap between the lower part of the staircase and the left wall. Something to ponder ... a strategically place bit of greenery? Maybe a piece of stripwood the same depth as the door trim and attached to the wall will blend in with the wood of the staircase. I don't believe the slight gap between the landing and the wall will be noticeable. If is is, a piece of baseboard/skirting on the wall would probably do the trick.

Hmm ... but now I see another problem: the upper right section will have to be trimmed to allow it to slide in along the cove moulding on the right wall. 

Have you noticed the Contractor is missing from this photo? I think he's in hiding.

Meanwhile, the railing that surrounds the upper story staircase hole is in the magnetic gluing jig. The piece at top is the kit solution. The balusters in the lower piece and the railing they stand on are glued. The light piece of quarter-round is raising the tip of the balusters so as to keep them horizontal. When the glue sets, the handrail will be glued in place. The balusters may be a tad bit far apart, but what did the Victorians know about OSHA? I think it will be aesthetically pleasing. 


Wednesday, June 13, 2018

Beacon Hill Staircase Makeover [Step 5 ~ Bottom stair begun]


The ground floor staircase has a bit of simple decoration. The panel inserts had 90-degree edges. I like them better beveled. All it took was a sharp eXacto knife and a little patience.

The inner panels edges have been beveled. The bit of quarter round taped in place is auditioning to see if edging the entire section would look better; it didn't make the cut. This view shows the wide balusters that are part of the kit. They will be replaced with the more delicate balusters like those used on the middle floor staircase.
Here are the beveled panels stained. I wish the grain of the wood were not so evident, but when it is installed in the house, I don't believe it will be as noticeable. 

And let the demolition begin! I started to saw off the balusters but realized quickly that the Easy Cutter would do a quicker and neater job of it. A little sanding and some stain, and the new balusters can be installed.
You can see how the balusters on the far side are truncated so the entire unit can slice in and out of the ground floor foyer. I haven't quite figured out how this can be accomplished with the new balusters. It may be that they will be attached to the handrail instead of the tread to become part of the middle floor railing unit. Still pondering this.
A little bonus: a set of wooden spoons turned up on the Greenleaf Dollhouse forum the other day. It inspired me to make a set for the Pierce/Bohemian Inn kitchen.
Here is the result of my first 1:12 attempt with its full size counterpart. The full size spoon was made by my father many years ago and is used frequently in my real life kitchen. The mini looks awfully small beside the full size spoon, but it is one inch long and the full size spoon is 12 inches long. (I just went back into the craft room and measured them to be sure!)

This closeup reveals the slight lopsidedness of the bowl. I used a couple very sharp eXacto knives, the carving tool in the photo above, and an emery board to get this far. A popsicle stick I happened to have on hand provided the wood; it has a nice, tight grain. A bit of paint will give it an aged, well used look.

In looking back over the file, I realized the Pierce was begun seven years ago, hibernated for two years, and after a brief spurt of effort has hibernated again for the past five years.  Poor Pierce. It's time to get the Beacon Hill finished so I can move on!


Tuesday, June 12, 2018

Beacon Hill Staircase Makeover - [Step 4 ~ Middle Stair Fitted]


How to attach the balusters to the treads, that was the question. As I recall, some have drilled holes and inserted wires or wooden pegs. I didn't have either on hand, so E-6000 glue to the fore. It will hold just about anything to anything and is strong.

The wall side of the staircase is on top. I put bits of quarter round under the balusters so they would not be glued at the very edge of the treads. Since the staircase is larger than the magnetic jig, I turned the jig upside down. You can't see the magnets holding it in place in this photo. The graph was cut from part of a quilting accessory. It is useful for lining up the bits and pieces. The newel post at the bottom of the stair is glued in place and will anchor the handrail. When the glue is thoroughly dry, the handrail will be glued in place by putting a tiny blob of glue on the ends of the balusters and again left to dry for a good long while.


The contractor and the doctor like what they see. The doctor is a bit put out that construction is taking so long, but this is New Orleans, which runs on its own schedule.

The E-6000 worked well. The unit looks flimsy but is really quite sturdy, even with the handrail not attached to anything at the very top. The contractor is explaining that a newel post will be part of the railing that will surround the opening in the floor. The handrail will fit snugly against it, giving the impression that it is all of one piece. [Smoke and mirrors. 😉 ] 

A coat of clear satin acrylic will be applied to all of the staircase sections when they are all finished. The next step is to tackle the ground floor stairs, which have two landings and need to be jury-rigged so as to slide in and out smoothly. I've ordered some flooring material, which means a bit will have to be shaved off so they'll fit.