Monday, February 11, 2013

Beacon Hill Tower Roof and Window; Porch Posts


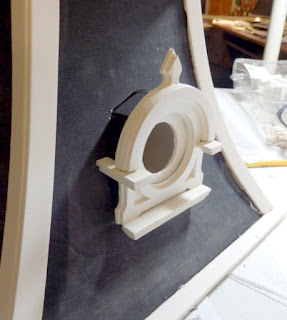
I was fiddling here and fiddling there and not seeing progress until I decided to finish the tower roof and window.  The instructions say to slide the inside unit in from the inside. It didn't fit through the tower wall. It looked too hard to adjust the opening in the tower wall, so I opted to slide it in from the front. I enlarged the roof opening to accommodate. After dry fitting, I glued the bottom of the wall and roof openings to glue in the sill.

The inside unit was tricky and needed to be trimmed and shaved in order to fit the openings in the inside wall and the mansard roof. I cut off about 3/8" from the backside and then shaved the back edge to fit inside the wall opening. I wasn't worried about the look, as it will be out of sight.

When the inside unit fit well, I glued it. I'm not worried about the irregularities around the window, as this will be covered when the roof is shingled. (The shingles will be a charcoal gray/sage green; the black is a background and is helping me imagine the house finished, since that won't happen until next fall at the earliest.)

The finished window (sans plastic "glass") is taped in place. I won't glue it permanently until after the roof is shingled.


The tower roof is resting atop the tower. I think I'll paint the rest of the roof pieces black to give the roof a semi-finished appearance to appease my need for an appearance of progress. Lloyd is working on his papier maché sculpture.

Working on the porch is the next step. I'm thinking the kitchen window bay needs to be finished first but need to reread the instructions. The porch posts were a bit of a challenge. With the three pieces laminated the surface was quite rough. I sanded and filled with Spackle to smooth them out. I didn't fill the base of the column as that will be covered by a piece of trim.


I glued the rectangular base trims on a bit too low, so the square trims wouldn't fit. I cut the squares in half and glued them at the top and bottom. The posts are gessoed. The rough spots still need to be Spackled. The trim bits in the tray are a bit daunting. Not sure if there will be time to deal with them before we head northward.

Sunday, February 3, 2013

Beacon Hill - Lighting Staged


Yesterday I dug out the lighting components in my stash and auditioned them in various arrangements. I thought I had everything needed, but apparently not. I believe I'll finish building before I install lights, but at least I know generally how it will play out. I did manage to sort and separate the jumble in the photo into two containers, one with lighting fixtures and the other with wiring supplies and components. The fixtures that made the cut are in a third container.

From left to right, to top floor rooms will be a sewing room, hallway, doctor's study -- or maid's room, sewing room, doctor's study. Middle floor: bathroom, hallway, master bedroom. Ground floor: dining room, entrance hall, parlor/music room.

Friday, February 1, 2013

Beacon Hill - Front Door


This morning, when the stain was dry, I put the pieces of the front door in place to see what they look like. While the trim on the windows will be painted, often the front door was varnished oak. I really like the way this looks, except what's that demi-lune above the door all about? At first I thought it might be crying out for a leaded glass panel, but I wasn't too excited about having to cut through the wall.


Then I rummaged through a little box labeled "Beacon Hill" -- a mix of potential adornments that has been accumulating for a couple of years. I found some flat-backed wood ornaments. I can't recall if I had a particular use in mind, but that doesn't matter. With a little trimming, it fit perfectly in the space.

Here's what it looks like with a coat of stain. I couldn't lean it against the wall again because it's wet. I'll paint the space behind the ornament dark brown or black to give the area additional depth.

Good news: While rummaging for the box of adornments, I found another piece of the porch. Not the piece I need to assemble the base, but progress, none the less.