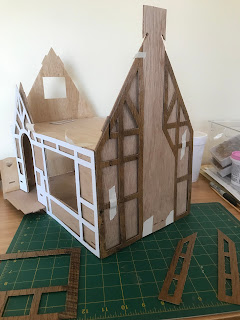
The timbers are looking much better with the covering of contact paper.
 |
The white cardboard has a brown backing. This view shows the front timbers stuck to the contact paper, which has a white backing. The utility knife is used to cut away the excess Contact paper.
This view shows all of the timbers plus the front door covered with the weathered wood Contact paper, and the main roof pieces are in place. The timbers are held in place by masking tape, another dry fit step. The instructions say to glue them in place, but they need to be removed so the walls behind them can be decorated.
This is the outer chimney wall. The timbering will be removed so the area behind can be painted with gesso to resemble plaster. The bottom row may be treated with Spackle and etched to resemble bricks. The chimney itself is asking to be fieldstone. Time to dig out the egg cartons!This view shows all of the timbers plus the front door covered with the weathered wood Contact paper, and the main roof pieces are in place. The timbers are held in place by masking tape, another dry fit step. The instructions say to glue them in place, but they need to be removed so the walls behind them can be decorated.


It's starting to take shape. I love the look of this sweet, little cottage so far. I'm so excited to see it's progress. =)
ReplyDeleteThe contact paper was such a unique idea, Kathie, and it turned out looking so charming! The cottage is going to really come alive when you add the stucco and brick texture. Butterflies are such a fun theme to allow your imagination to play!
ReplyDeleteWhat a nice project! I went back to your two previous posts to see the progress from start and loved every step.
ReplyDeleteGood luck at your new home!
Hugs, Drora