Monday, July 30, 2012
Quilt Shop Roombox Progress without Pictures
I know, no fun not to have photos, but there were no Kodak moments today. Click on the underlined links below if you really need a photo fix.
Do you call how I said the double muslin on the walls was perfect? Well, it isn't. Found bubbling. Broke down and ordered some ecru ceiling paper from Hobby Builders Supply. It is big enough to stretch the full 12" height of the room and thick enough to cover wiring (so the catalog says), so it ought to smooth out the rough spots in the remodeled walls.
While I was at it, I ordered some embossed ceiling panels. Strangely, the catalog does not indicate whether they are plastic or paper, but either one will work. I'm guessing plastic from the photo. I think a nice pressed tin ceiling will be nice in the quilt shop.
Lastly, I checked out HBS's resin dolls and found Dot, who asked to come work the sewing machine. All of this came with a 20% discount. It was almost painless to press the order button.
While I was in a shopping mood, I looked again at the miniature working ceiling fans at Creative Reproductions 2Scale website. They're gorgeous, but way out of the budget for this project. Casey of Casey's Minis blog suggested looking at holiday ornament spinners. Christmas in Prescott had a nice selection. I ordered two of them. One is battery operated and the other an electrical spinner motor. The electrical one plugs into a string of Christmas lights. Not sure how that can be used with 12v system, but it's worth a shot.
While I'm waiting for all of the above, I'll be busy. Dug into my stash last night and found taller ballusters and new handrails, so the railing will be a bit larger than the original, which was lovely for a more delicate setting but really doesn't work in a commercial establishement. Also found Houseworks wood flooring and enough ceiling molding and baseboards, which need to be painted. (Note to self: See, I knew ordering extras was a good idea!)
Will also be building a new set of steps. Tried to saw the originals in half. Didn't work well. They are solid wood and the little handsaw got a case of the wobbles.
Sunday, July 29, 2012
The One-armed Paper Hanger
Not quite one armed, but met a challenge at any rate! The first photo is a single layer of muslin adhered with liquid starch. I was disappointed in the result. It didn't cover the slight irregularities in the surface and was so thin as to be nearly translucent. The starch did hold well, however. I grumbled to myself and figured I'd have to go with paper after all if I wanted a smooth surface.

Then I had a brain flash: why not double the fabric? I don't know if you can see the difference, but this second try is perfect. I painted starch on the gessoed board and pressed one layer of muslin into it and gave it a coat of starch, too. Pressed the second layer onto it, smoothed it with my hands, then used an iron to press it flat and dry the starch. The result is just what I wanted.
I've had the pieces of wall in and out so often that I think I can apply the fabric to all of them while they are flat, before sliding them into place. The fabric will act as hinges between the sections. Except for the back wall, of course, but I think that one will be far enough back that little irregularities won't be bothersome. And of course there will be quilts and wall hangings on it.

Having solved that problem (I hope), I decided to move on to staging, as other adjustments must be made. I knew the worktable was too big for the elevated work area, so I cut out a section and reassembled it.

It will be dark in that corner but I found a nice bridge lamp in my stash that will lighten it. It is a bit short, so I made a base for it and painted it to match the wainscoting. I doubt that the base will be seen.

I spent a good bit of time playing with the bits and pieces. The troublesome piece was the big fabric shelf unit. It has bolts on both sides and one end, and I want to be able at least to glimpse all of them. This arrangement works except that no quilter is going to get her skinny butt between the tall unit and the low one beside it, nevermind be able to pull out a bolt.

However, if the stairway gets cut from 5" to 2-1/2" inches, there would be room on both sides of the tall unit. The only bits a viewer can't see with this arrangement are the muslins and batting on the backside of the counter in the front. There's a sign on the end that says they're there and one can be seen between the flannels; maybe that's enough. The stairs are still in one piece as I type this, but I think that will change soon.

I mentioned yesterday that I want to change the view outside the window. If the door windows were to stay clear, the new picture would have to wrap around inside the box. In the spirit of keeping things simple (ha! it's never simple!), I glazed the door with frosted glass (acetate). The light will come through, so it ought to look just fine.

With that little task completed, the workers left for the day.
Saturday, July 28, 2012
Patching Mini Wallboard
Today I put a coat of satin finish polyacrylic over the painted door and woodwork. I like the effect better than the matte finish. Filled in the gaps for fireplace and shelf holes by gluing together two sheets of chipboard, then glued a piece of paper over the patch to seal. This is the back of the hole where the shelves were. They gray areas in the second photo are the paper patches.

I removed the extra bit of spacing on the right side, so the wall is flat agains the outside of the box. I used an extra piece of illustration board to alter the size of various sections to fit the new spaces. It is a really nice sized room now. The piece lying on the floor is my test piece. Will let the glue dry overnight, then put on another coat of gesso to cover the paper patches. Will adhere some muslin to it using liquid starch when the gesso dries and see how that goes.

I am reluctant to glue the walls in place just yet. I don't think I want any wall sconces or wall plugs, but if I change my mind, will be hard to add after gluing walls.
Am considering a working ceiling fan since this is a 12-foot ceiling, but other than a work light at the work table on the upper level and lights behind windows, not sure where else to put fixtures. May put LEDs on ceiling at the front of the box to give general illumination. They would be hidden by the framing. Might also consider a cornice above front edge of elevated portion to hide a few more LEDs to get light into the back. The same place that sells the working fans offers remote control devices that enable controlling lights individually. I'm thinking about it.
Friday, July 27, 2012
Positive Progress, Finally
Coated all of the interior walls with gesso to seal up the illustration board that had its top layer of paper removed when the wall fabric was stripped. I rummaged around in the fabric stash and decided that the wall covering will be unbleached muslin. I have plenty of that on hand. Now all I have to do is figure out the best way to adhere it to the gessoed boards. Suggestions welcome!
Here's a tip that works well with all kinds of paint containers. Use a piece of thin plastic bag, doubled, between the lip of the container and the lid. The lid won't stick, and the plastic is easy to replace. Works for screw tops or pound-in paint can lids. See how clean the inside of the lid is?


With the pale ivory of the unbleached muslin on the walls, the white woodwork didn't seem like such a good idea. I'm going for neutral, not antiseptic. I auditioned a few colors before settling on Ceramcoat's Dolphin Gray. Painting acrylic craft paint over a satin finish is a bit tricky. The first photos shows two coats of acrylic. The undercolor can still be seen.

After four coats of paint, the surface is smooth and rich. There's a bit of muslin near the bottom left. It works well with the paint. The acrylic has a matte finish. I'm thinking maybe a coat of clear satin polyacrylic would be a nice touch. With the door panel flat on the table, it was easy to fix the broken bits.

Here's where we were when the workmen quit tonight. The walls are gessoed and waiting for the muslin. I think they will be glued in place first so the muslin can go on in three pieces to minimize seams.

The work table turned out to be too big to use on the upper level. Will have to cut one down or make a new table. I do like the idea of making this a work area.
Oh, yes ... now the picture seen through the window is beginning to bug me. It's a dark scene made darker by the gray window framing it. The picture itself is darkening with age. Time to replace it!
Thursday, July 26, 2012
The Knee Wall's Connected to the ...
There isn't a knee wall, but I really wanted to do a take on the song. I discovered that just like in the lyrics, one thing leads to another, even in miniature remodeling. Thought about it overnight and decided I really want the striped wall coverings gone. When I got to it, I discovered the bit of wall with the door was just duck-taped to the back wall. Ha! Didn't take long to get that puppy out of there. It will be so much easier to fix the muntins in the door and repaint it. Did I mention that the white paint is on the ivory side and yellowing in places? I want something of a brighter, cleaner white.
Then I took out the flooring on the upper level. It was very thin, no texture, and the sealer had turned yellow. Of course I had to take out the baseboard to get the floor out. This is what it looked like at that point, as I contemplated taking out the shelves.

After about 35 seconds of contemplation, as you can see, the shelves are out (they're just sitting there, waiting for the movers to get them), and so is the angled wall with the tall wainscoting. So is all of the striped wall cloth. So is 3/4 of the window frame. Will the 3/4" spacer be removed so as to gain another 9" of floor space on the right side? Jury's still out.

This is the what came out. The top surface of the illustration board peeled off with the fabric and wainscoting. The wainscoting was a bit warped, which was one of the deciding factors for taking it out on the side walls; the back wall will stay the way it is.

I think I'm going to use a thin posterboard to form a smooth surface on the walls, then give it a coat of gesso to seal. In any event, I'll be diving into my stash to find a nice, light, quiet batik to use on the walls; something soothing and neutral to back up the colorful quilts. Since every one of my fat quarters has a mouse-bit out of a corner (to make the bolts for the shop), more likely this means a trip to a quilt store. Haven't figured out yet just how much I'll need. Rule of thumb says the amount will be just a tad more than I have on hand.
It will be nice to be able to finish each section of wall before putting it back in and have some wiggle room for installing electrical bits. Do I want to keep to the old house look and use a couple of chandeliers in the main room, or has the proprietor installed modern lights? Pot lights over the cutting table? A floor lamp on the upper level by the worktable? Decisions, decisions!
Time to go through the fabric stash & electrical storage box!
Wednesday, July 25, 2012
The Wall Comes Tumbling Down
I thought about the best way to get the fireplace wall cut loose. Cutting along the edge of the wainscoting seemed like the best idea, but cutting inside the box was awkward. I got out the Dremel and drilled a line of holes beside the wainscoting, then connected the dots on the backside of the wall. It will be easier to cut from the back with a sharp utility knife blade.
Notice the markings on the wall. The interior walls are all made of heavy duty illustration board.

The cutting went pretty well, and with the odd bit of walls masking taped in place, the shop now looks like this:

The big shelf unit fits perfectly against the left wall and covers the fireplace opening. I removed all of the ceiling moldings before removing the wall and marked their location. If by chance I find more of the same molding, I won't have to cut all of it. The angles, by the way, were mitered perfectly, even on the angled wall.
Did you notice the stairs moved yet again? The railing on the right is glued, that's why it's in an awkward place. I can take care of that. It occured to me that with the steps to the left, the right side of the upper part would make a good place for a worktable and sewing machine. What quilt shop doesn't have a sewing machine set up?
The window seat cushion is gone and I think the filigree work is going, too. With the bright colors of the shop contents, it will be busy enough in there. In fact, I am thinking about taking out all of the striped material and substituting a more subtle pattern in paper or fabric -- or simply paint the walls. It will be a much better background for displaying quilts and wall hangings.
I like the low wainscoting on the back wall, the taller stuff not so much. It may come out. And the built-in shelves are in jeopardy, too. You can't see because of the bit of striped board sticking out on the right side, but that wall could move back about 3/4" if the shelves disappear. And since I'm not crazy to make more accessories to fill those shelves, and since the slot wall doesn't look good against them . . . hmmm. I hear the jackhammers revving up again.
I'll be so happy when I get to the point of putting something into this project rather than taking stuff out!
Tuesday, July 24, 2012
The Demolition Continues
It's amazing how much damage can be inflicted by a tiny screwdriver, tack hammer, and a sharp utility knife. I took out the built-in seat on the right side. It gave more of a fight than the one on the left, leaving some of the cloth wall covering damaged. Not a problem, though; it's a place that will be hidden.
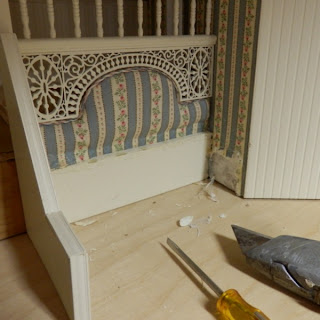
With both of the lattice dividers out, it occurred to me that I could remove the railing part and use it alone. Here is is propped up temporarily. I like the way it opens up the back area. One of the latticework sections can be used in the window. The right side stair railing can be fitted against the stairs. It won't be stuck out so far. You can almost tell that those big old lights are gone. Add new wiring to the to-do list! The rest of the lattice has been put aside to use someplace else. (The New Orleans Victorian Beacon Hill comes to mind.)

The railing pieces have holes drilled top and bottom. The top ones can be filled easily enough. One problem is that one section has a handrail piece glued on upside down. Do I leave it as is and figure it will be far enough back that no one will notice? I really don't want to think about trying to take it loose from the ballusters to flip it. Maybe a nice quilt draped over it will do the trick.

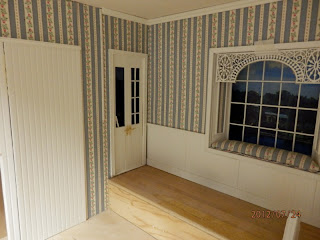
With the latticework out of the way, the doorway pops into view. I really thought it was just another window! The muntins on one side popped out, but I have them and they can be glued. Am thinking about taking out the cushion on the window seat to make a plain painted sill. I like the fabric pattern on the walls, but it is just a bit too fussy here. There is a 2-3/4" piece of wall between the edge of the doorframe and the wainscoting. I believe I'll cut the wall there so I can step it back to the outer wall of the box. I have enough decorated wallboard to make a nice jog in the wall.

With both of the lattice dividers out, it occurred to me that I could remove the railing part and use it alone. Here is is propped up temporarily. I like the way it opens up the back area. One of the latticework sections can be used in the window. The right side stair railing can be fitted against the stairs. It won't be stuck out so far. You can almost tell that those big old lights are gone. Add new wiring to the to-do list! The rest of the lattice has been put aside to use someplace else. (The New Orleans Victorian Beacon Hill comes to mind.)


With the latticework out of the way, the doorway pops into view. I really thought it was just another window! The muntins on one side popped out, but I have them and they can be glued. Am thinking about taking out the cushion on the window seat to make a plain painted sill. I like the fabric pattern on the walls, but it is just a bit too fussy here. There is a 2-3/4" piece of wall between the edge of the doorframe and the wainscoting. I believe I'll cut the wall there so I can step it back to the outer wall of the box. I have enough decorated wallboard to make a nice jog in the wall.

Next on the agenda: moving the wall.
Monday, July 23, 2012
Demolition & Staging
It seems as if bashing a Brooke Tucker room box borders on desecration, but I'm thinking of it as a Victorian home that is being remodeled into a fine contemporary quilt shop.
The first thing to go was that bit of wall blocking the view of the shelves. Not sure that the shelves will be used as shelves. They may be covered by a hanging quilt. But nonetheless, the wall had to go. The outer piece came off easily. The angles piece was more of a challenge, but it, too, gave way, leaving a wedge of plywood on the floor and another on the ceiling.

Luckily, the wedges weren't glued. A little effort with the handsaw and they were gone. Isn't it nice to be able to flip mini houses upside down?
I also tore out the built-in seat on the left side. It is a perfect spot for a couple of fabric bolt shelf units. The cushion part is on the floor. With just these few pieces inside, it became apparent that the left wall needs to be moved back against the outer wall of the box. Just that bare inch or so will make a difference. The angled part of the right wall can be trimmed to fill out the gap made by its removal. I'm hoping the cloth wall coverings will hold up under the remodeling and not have to be replaced.

The first thing to go was that bit of wall blocking the view of the shelves. Not sure that the shelves will be used as shelves. They may be covered by a hanging quilt. But nonetheless, the wall had to go. The outer piece came off easily. The angles piece was more of a challenge, but it, too, gave way, leaving a wedge of plywood on the floor and another on the ceiling.

Luckily, the wedges weren't glued. A little effort with the handsaw and they were gone. Isn't it nice to be able to flip mini houses upside down?

I also tore out the built-in seat on the left side. It is a perfect spot for a couple of fabric bolt shelf units. The cushion part is on the floor. With just these few pieces inside, it became apparent that the left wall needs to be moved back against the outer wall of the box. Just that bare inch or so will make a difference. The angled part of the right wall can be trimmed to fill out the gap made by its removal. I'm hoping the cloth wall coverings will hold up under the remodeling and not have to be replaced.

I have some other ideas. I want to take out the upper section of filligree to get rid of the mis-matched joints and the cloth section. I'll replace them with a strip of posts like the ones below the opening.
What to do next? Probably moving the fireplace wall, but the current lights maybe ought to come out first.
I'll try to blog this daily if life doesn't intervene too much. Ideas and suggestions welcome!
The New Quilt Shop
Hard to believe it has been nearly ten months since I last posted. Made a little progress on the Beacon Hill in New Orleans, but haven't done any mini work here in Missouri -- until today!
Last week I got back the contents of the quilt shop from my niece. She now has the dollhouse that my father made and I have the contents. I was going to list them in my Etsy shop but then thought about a room box that has been gathering dust for several years. A cousin took a class with Brooke Tucker some years ago but didn't finish the box and gave it to me. Brooke is now retired, but some of her exquisite work can be seen here.
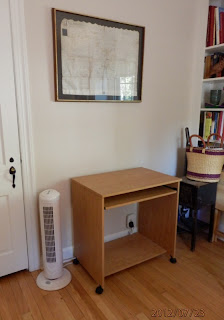
So, this morning I cleared off an extra computer table and moved it into the library to use as a base.
(As a result, the dining room table is now useless until I clear off the stuff dumped on it.)
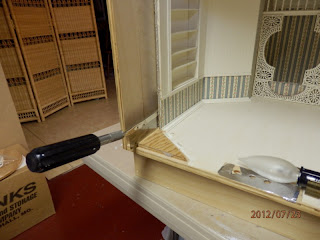
 I managed to extricate the room box from the shelf where it's been buried and set it up on my basement worktable and began to clean it up. I'd forgotten how big it was! The ceiling height is 12 inches and the outer walls are 21 inches apart. There is a raised area at the back, with see-through windows, and two built-in seats. (Don't forget to click on the photos for a bigger picture.)

The fireplace is not attached. The walls are "papered" with cloth with painted wood wainscoting below.

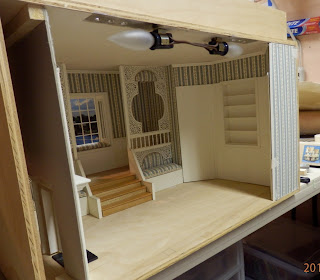
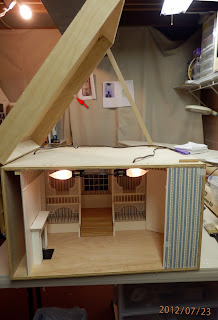
The top opens to reveal the electric cords and switches. There are four bulbs, the two seen in front and two in back that mimic sunlight. It's also a great place to store bits and pieces while working on the shop!
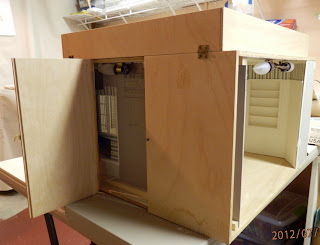
Here are the views of outside. Both sides and the back have doors that open.

Well, nothing ever goes as easily as planned, so what's going to happen here? More than I'd counted on!
Last week I got back the contents of the quilt shop from my niece. She now has the dollhouse that my father made and I have the contents. I was going to list them in my Etsy shop but then thought about a room box that has been gathering dust for several years. A cousin took a class with Brooke Tucker some years ago but didn't finish the box and gave it to me. Brooke is now retired, but some of her exquisite work can be seen here.
So, this morning I cleared off an extra computer table and moved it into the library to use as a base.
(As a result, the dining room table is now useless until I clear off the stuff dumped on it.)


The fireplace is not attached. The walls are "papered" with cloth with painted wood wainscoting below.

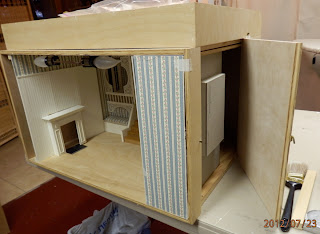
The built-in shelves were nearly hidden behind the wall extension on the right. You can see the "view" out the center window in this picture. The back door was open when I took the previous shots.

The top opens to reveal the electric cords and switches. There are four bulbs, the two seen in front and two in back that mimic sunlight. It's also a great place to store bits and pieces while working on the shop!

Here are the views of outside. Both sides and the back have doors that open.


Well, nothing ever goes as easily as planned, so what's going to happen here? More than I'd counted on!
- The lights are awkward and burn HOT. They need to be replaced with LED lights.
- The bit of wall blocking the view of the shelves has to go.
- The fireplace wall needs to be moved back against the outer wall of the box.
- The built-in seats need to go to make room for fabric bolt racks.
- The outside needs to be finished in some way -- to look like a building or just a nice finish on a box?
Subscribe to:
Posts (Atom)